Table of Contents
Introduction
Gravity Pilot 2 is a premium WordPress plugin (with an upcoming free variant) that augments your Gravity Forms workflow with AI-driven form creation, powered by OpenAI. Users can generate forms in seconds using various GPT or Reasoning/Chain-of-Thought models, either in a streamlined Easy Mode or via the more configurable Advanced Mode.
Note on Versions
- Free Version: Only Easy Mode, includes streaming preview, but no Reasoning/CoT (o3-mini), no Advanced Mode, no Companion GPT link.
- Paid Version (this documentation): Easy Mode + Advanced Mode, Reasoning/CoT (o3-mini), Companion GPT, debug logs, advanced token usage stats, and more.
Key Features
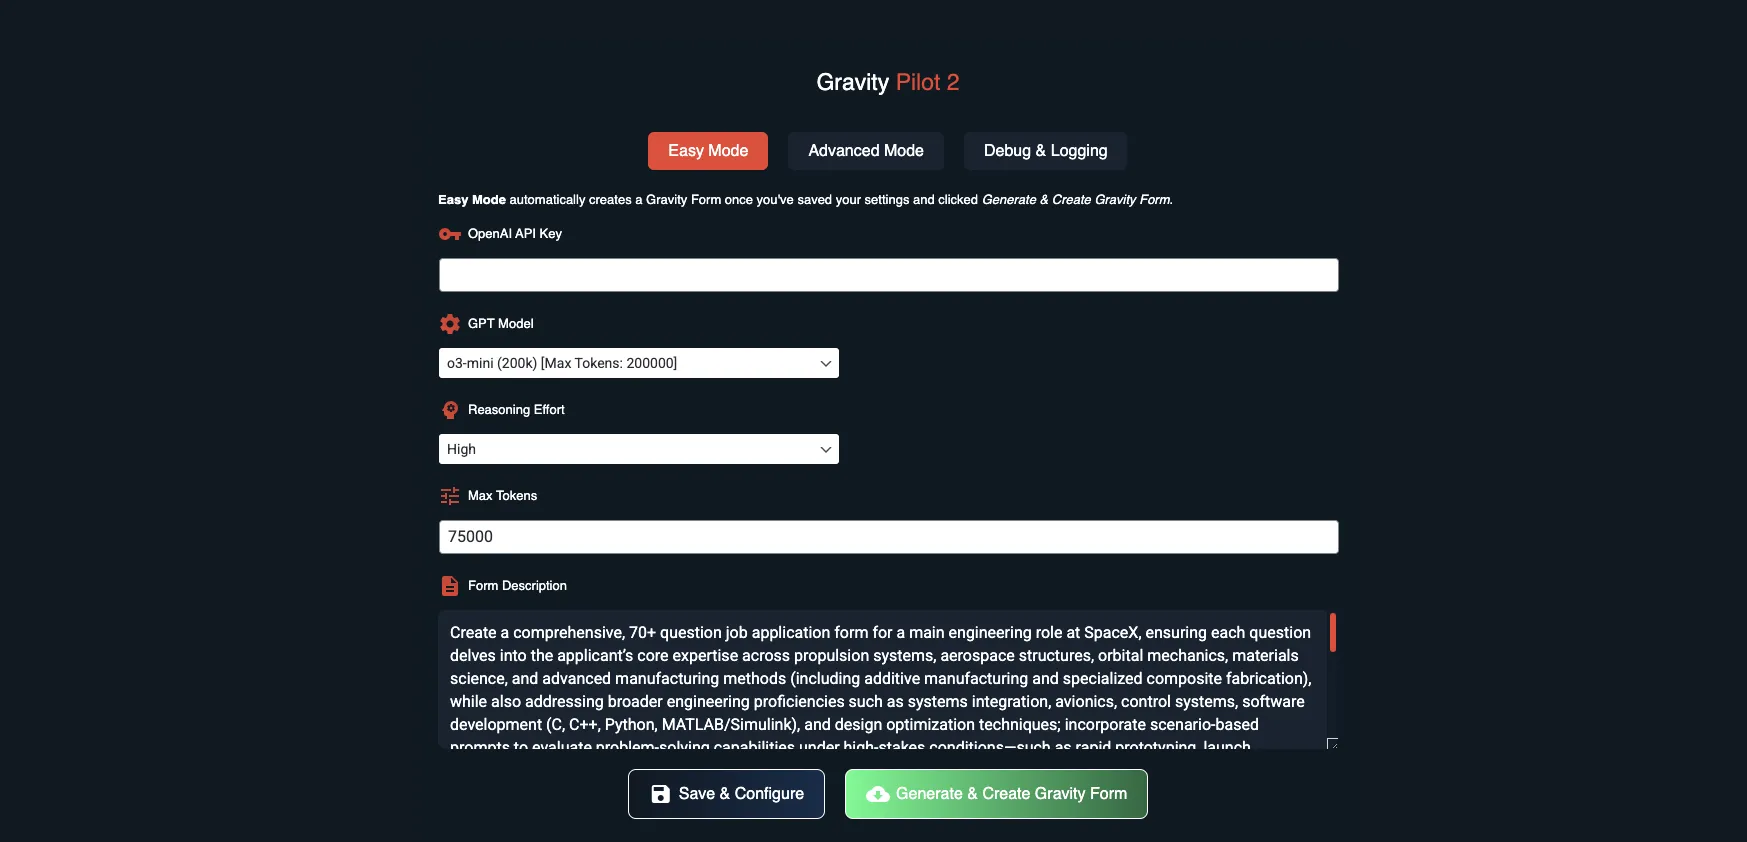
Easy Mode
- Generates complete Gravity Forms with minimal prompting.
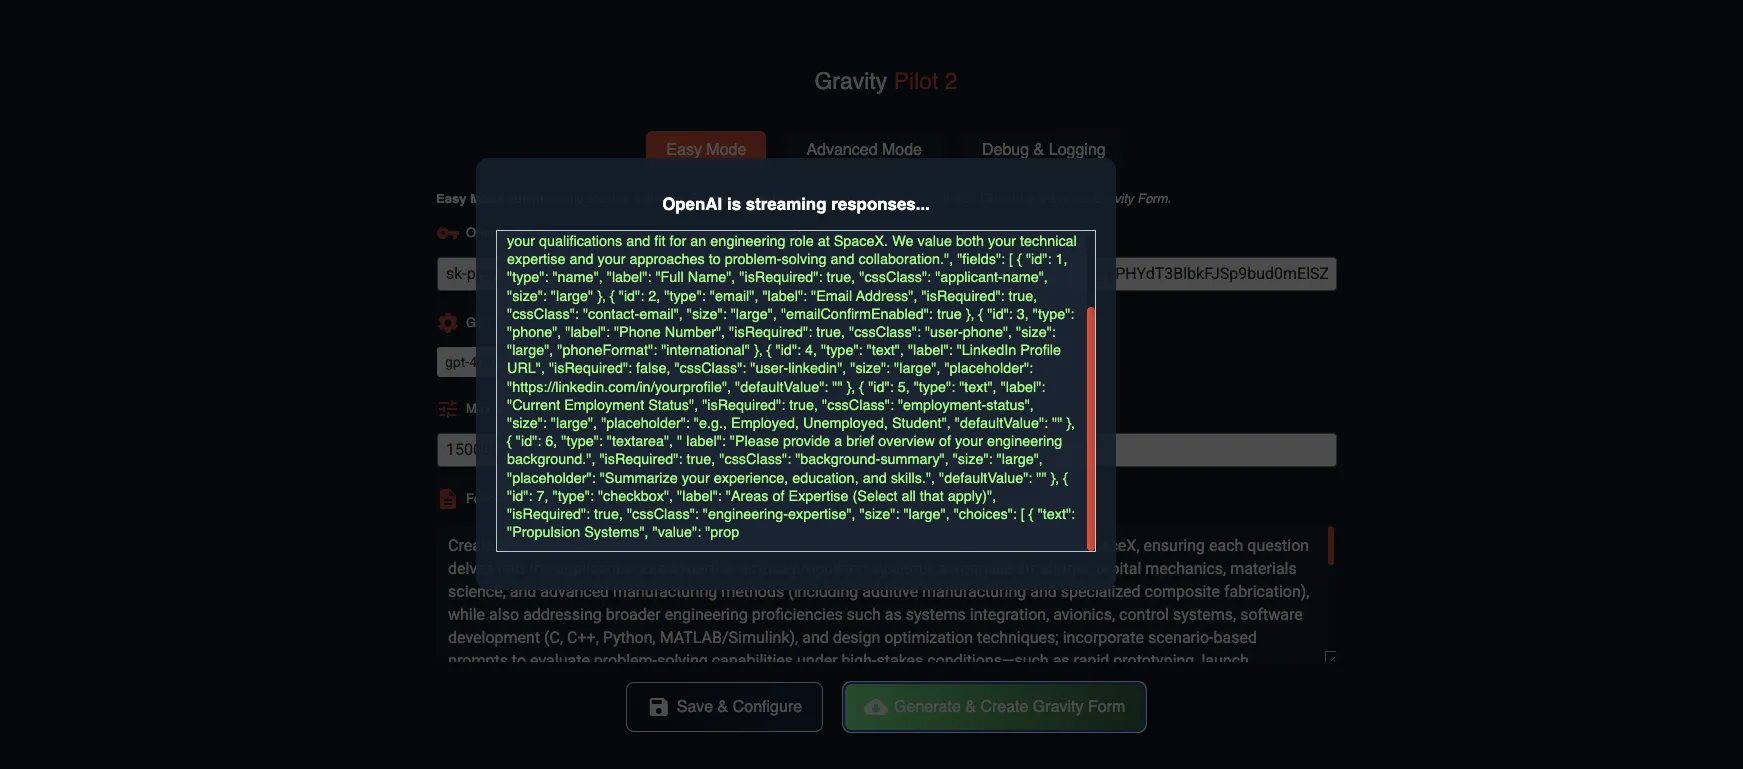
- Streams the AI-generated JSON so you can watch your form being built in real time (available in both Free and Paid).
- Uses gpt-4o or gpt-4o-mini (and can use o3-mini if on the Paid version).
- Default model is gpt-4o-mini with 15,000 max tokens.
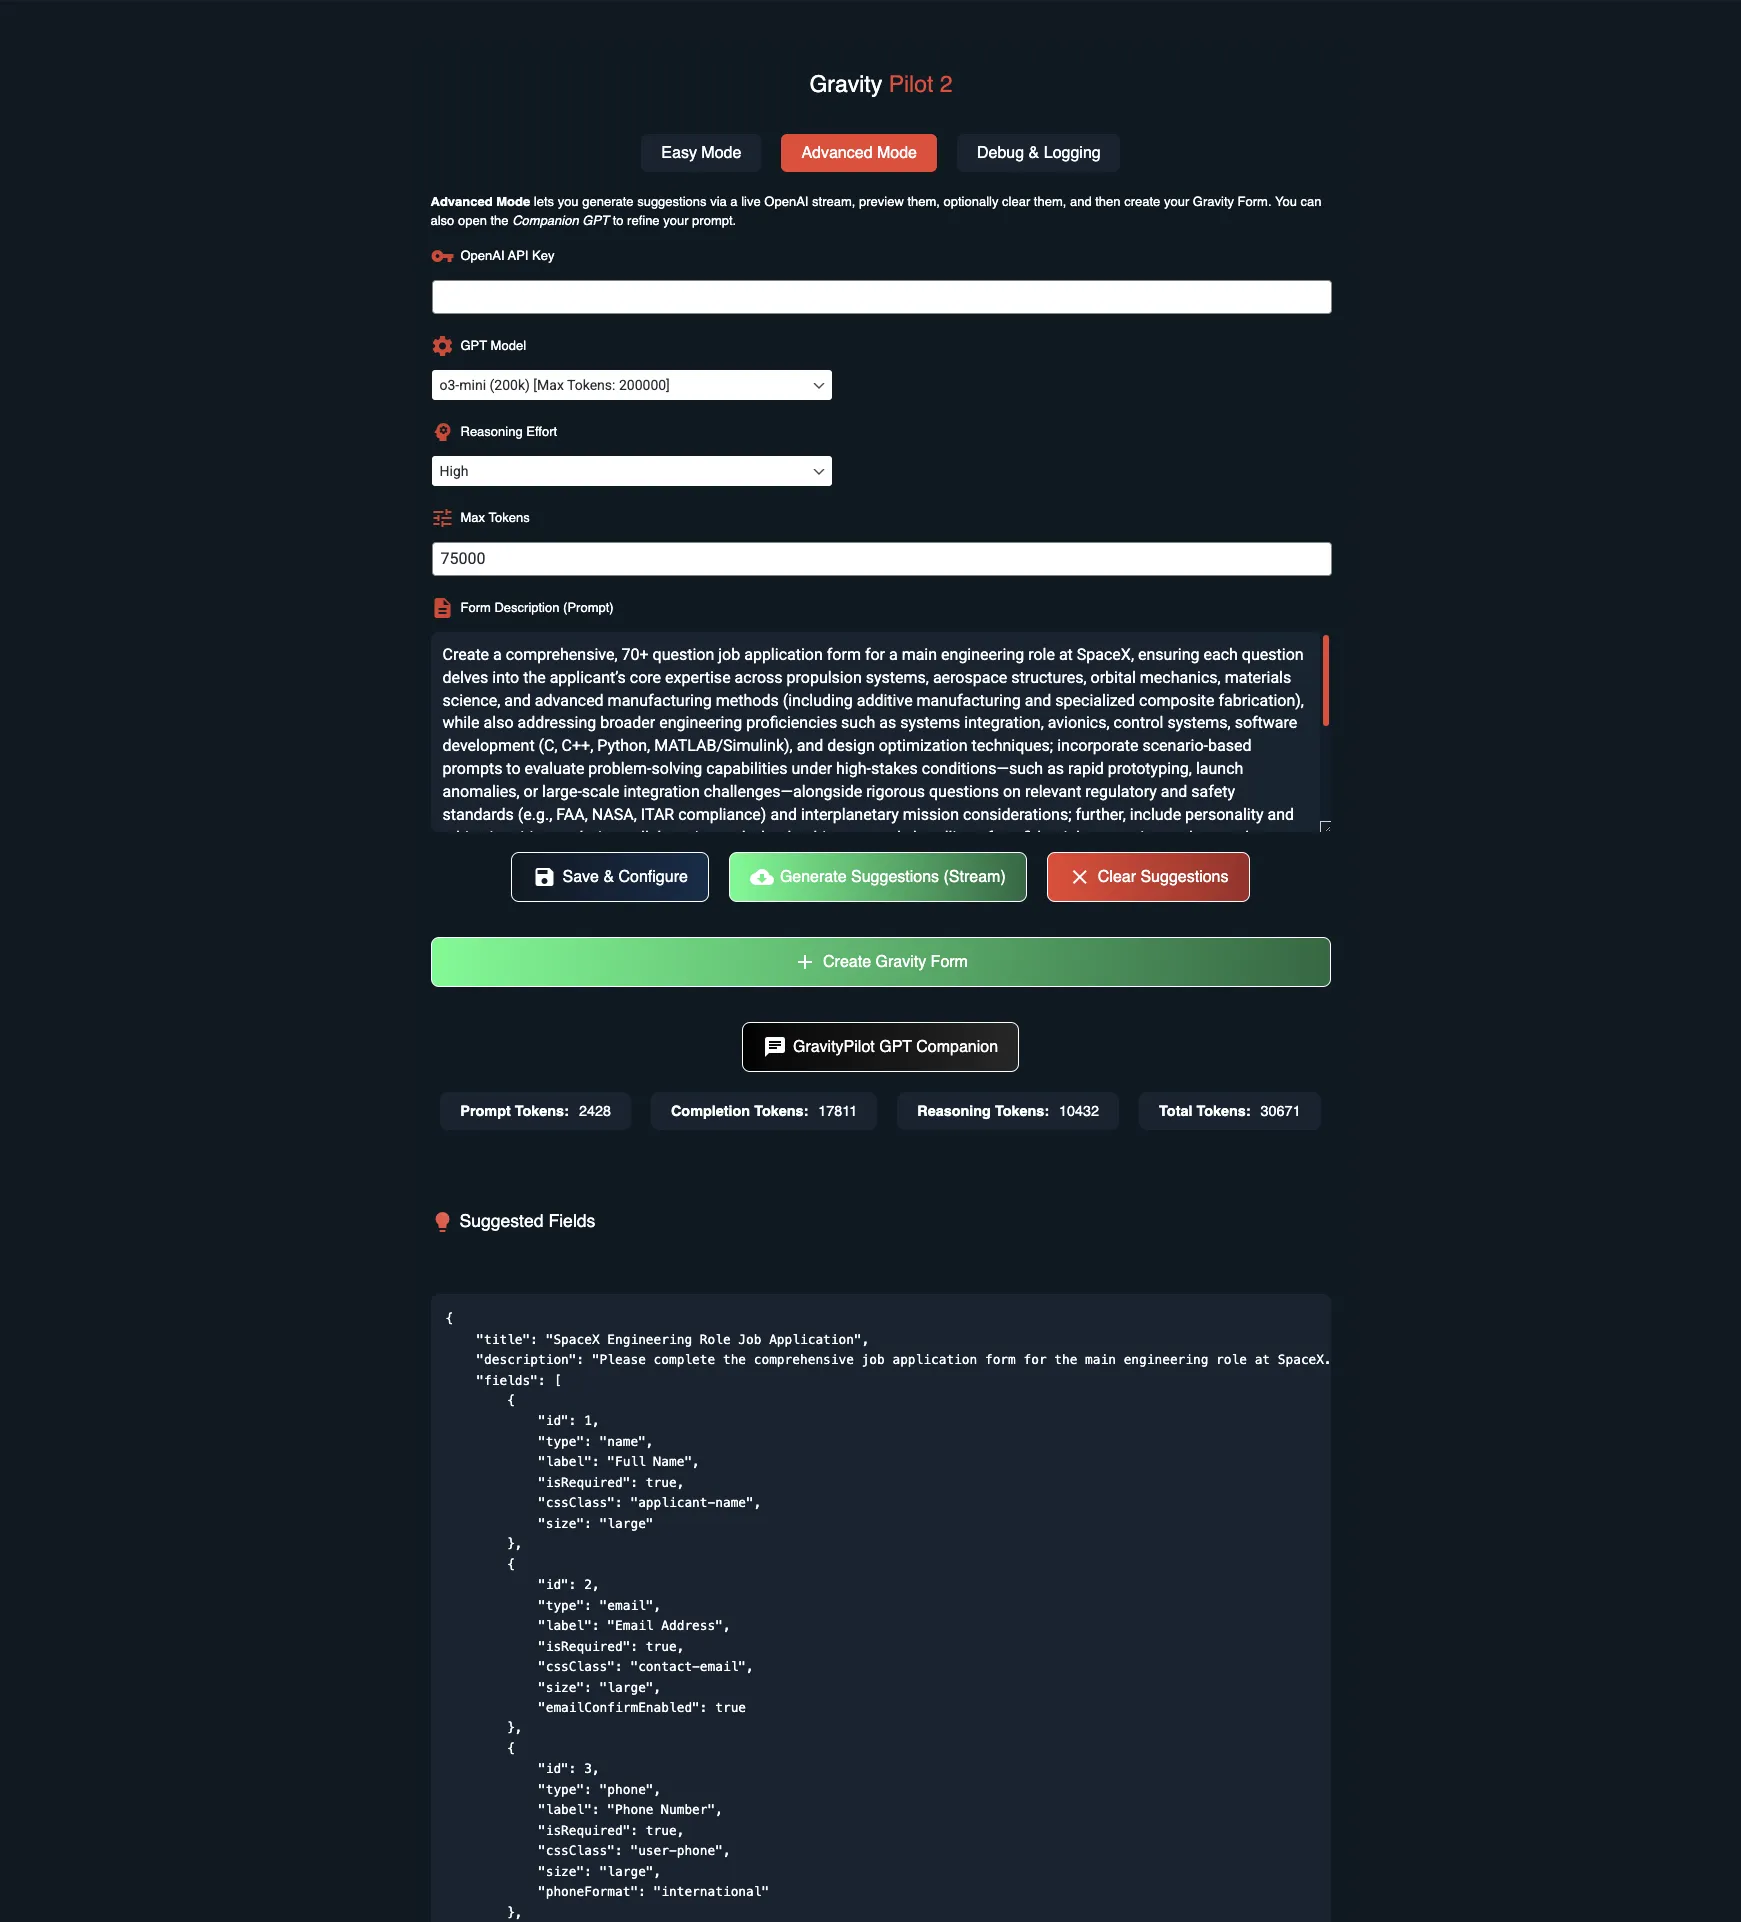
Advanced Mode (Paid only)
- Preview raw JSON before creating your Gravity Form.
- Provides a GPT Companion link for detailed multi-turn conversations and iterative prompt refinement.
- Displays token usage stats (Prompt, Completion, Reasoning tokens).
- Streams the JSON output in real time as well.
Reasoning / Chain-of-Thought (CoT) Model (o3-mini) (Paid only)
- Up to 200,000 tokens.
- Additional Reasoning Effort setting (Low/Medium/High).
- Must set max tokens to at least 25,000 (preferably 50,000+) for large, complex forms.
Debug & Logging
- Toggle logs for troubleshooting.
- Downloadable debug log for support.
Free vs. Paid Versions
Free Version (Coming Soon to WordPress.org)
- Easy Mode Only
- Streaming Preview is included in Easy Mode.
- No Reasoning/CoT model (o3-mini).
- No Advanced Mode tab.
- No Companion GPT link.
- Limited to GPT-4o or GPT-4o-mini (16,384 tokens max).
If a new version is released, you may see additional download links or notices in your account. Automatic updates via WordPress are not yet enabled, so re-download and reinstall if you need the latest features.
Ideal For: Quick, simple form generation without advanced refining or extremely large prompts.
Paid Version (Current Release)
- Easy Mode + Advanced Mode
- Reasoning / CoT with o3-mini (up to 200k tokens).
- GPT Companion link for multi-turn chat.
- Detailed token usage stats for every generation.
- Priority support via https://gravitypilot.io/support/.
Installation & Activation
- Purchase the Paid Version (or watch for the Free version release if you have simpler needs):
- Paid: https://gravitypilot.io/buy/
- Download your plugin from https://gravitypilot.io/my-account/downloads/.
- Install via WordPress
- In WP Admin, go to Plugins > Add New.
- Click Upload Plugin → select the ZIP file → Install → Activate.
- Requirements
- WordPress 5.6+
- Gravity Forms (any license)
- PHP 7.4+
- OpenAI API key from https://platform.openai.com/.
Configuring OpenAI Settings
API Key
- Obtain from https://platform.openai.com/.
- Paste into the OpenAI API Key field in GravityPilot 2.
- Keep it private.
Model Selection
Default: gpt-4o-mini (16,384 tokens max).
- gpt-4o / gpt-4o-mini
- Both share a 16,384 token limit.
- gpt-4o-mini is cheaper; gpt-4o can be slightly more refined but costs more.
- Great for short or moderately complex forms.
- o3-mini (Paid Only)
- Up to 200,000 tokens (input + output + reasoning).
- Additional Reasoning Effort setting: Low/Medium/High.
- Must set max tokens ≥ 25,000 (preferably 50,000 for big forms).
- Ideal for advanced or specialized forms (70+ questions, multi-domain, etc.).
Max Tokens
- Defines how much text the AI can produce before cutting off.
- If partial JSON appears (finish_reason=length), increase max tokens.
- gpt-4o / gpt-4o-mini → max 16,384 tokens.
- o3-mini → max 200,000 tokens (OpenAI suggests at least 25,000; 50,000 is often best).
Cost Tip: o3-mini is still quite cost-effective compared to other large models. For simple forms, gpt-4o-mini is fine and cheaper.
How Gravity Pilot 2 Works
Easy Mode (Free & Paid)
- Enter Your Prompt
- In Form Description, type something like:
“Make a simple contact form with Name, Email, Phone, and a message field.”
- In Form Description, type something like:
- Click “Generate & Create Gravity Form”
- Watch the real-time streaming of the JSON.
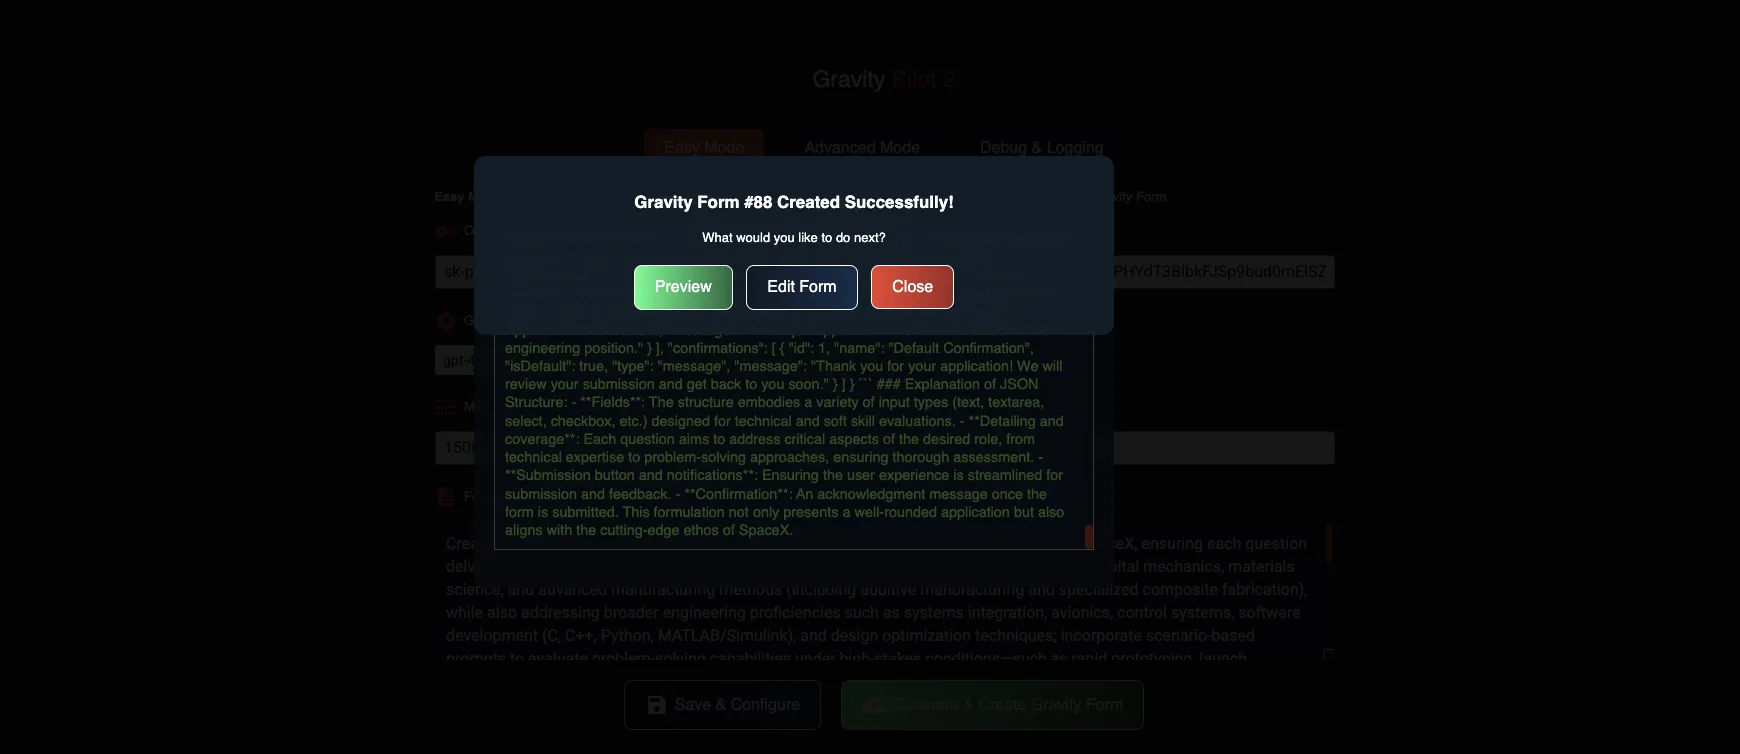
- Upon completion, a new Gravity Form is created automatically.
- A modal will popup with the ability to preview, edit, or close the dialog.
- After closing the modal, you may inspect the token usage in the advanced tab (Paid Only).
- Edit in Gravity Forms (Optional)
- Add pages, conditional logic, or calculations afterward in Gravity Forms’ editor.
Defaults: to gpt-4o-mini with 15,000 tokens. This is usually enough for small/medium forms. If truncated results appear, raise max tokens or switch to o3-mini.
Advanced Mode (Paid Only)
- Refine Your Prompt
- Paste a more detailed description or the entire Companion GPT conversation output.
- Example: “Create a 70+ question job application form for a senior-level developer, covering front-end, back-end, security, DevOps, etc.”
- Generate Suggestions (Stream)
- The plugin streams JSON in real time.
- After it finishes, you’ll see a modal popup with the ability to generate the form immediately or close and inspect the JSON output and token usage before creating the gravity form.
- Review & Create
- Inspect the JSON. If satisfied, click Create Gravity Form.
- If incomplete (cut off), increase max tokens and try again.
The Companion GPT (Paid Only)
The Companion GPT is an external, ChatGPT-like environment that empowers you to craft and refine long or complex form prompts with multiple back-and-forth iterations before finalizing.
- Accessing the Companion GPT
- In Advanced Mode, look for the “GravityPilot GPT Companion” button/link.
- This will open a specialized GPT-based chat session in a separate tab.
- How It Works
- You can converse with the AI, iterating on your prompt.
- For example, start with:
“I want a 70+ question form for a senior web dev role covering front-end frameworks, back-end, and DevOps.” - Refine your prompt based on the AI’s suggestions:
- Add scenario-based questions.
- Focus on certain programming languages or frameworks.
- Incorporate personality and ethics prompts.
- Continue until you get the perfect long outline form output.
- Manually Copy the Final Form Outline
- Do not use the built-in copy code button in the chat interface because it can yield a truncated or “lesser” version.
- Instead, highlight all text from the Form Title to the end of the Notifications & Confirmations.
- Right-click > Copy (or Ctrl/Cmd + C).
- Paste into Gravity Pilot 2
- In Advanced Mode, paste the entire final JSON into the Form Description box.
- Save & Configure, then click Generate Suggestions (Stream).
- The plugin will re-process the JSON to ensure compatibility with Gravity Forms, and you can then Create Gravity Form.
- Why Use the Companion GPT?
- Ideal for elaborate forms or highly specialized requirements (e.g., a 70+ question aerospace engineering form).
- Cheaper overall because the “heavy lifting” happens in the external GPT chat, and you only finalize the form once in Gravity Pilot 2.
Multi-turn conversation results in more refined and deeply customized final Form than a single-prompt approach.
Pro Tip: If you’re already generating detailed form outlines in the Companion GPT, you don’t necessarily need to select a higher-cost GPT model in the plugin (like gpt-4o). The custom GPT is providing the full structure. Just ensure you paste it fully and set your tokens high enough if you use o3-mini in the plugin.
Prompt Examples
Creating a detailed prompt yields more accurate, specialized forms. Below are short and long examples:
Short Prompt Examples
Senior Web Developer Form (Short)
Create a comprehensive job application form for a senior-level web developer, covering front-end, back-end, full-stack skills, and personality insights. Target at least 70 questions.
Junior Attorney Form (Short)
Generate a 70+ question application form for a junior-level attorney at a tech-focused law firm, exploring legal competencies, regulatory knowledge, and problem-solving.
Senior AI Engineer Form (Short)
Build a 70+ question application form for a senior AI Engineer role, covering machine learning fundamentals, frameworks (TensorFlow, PyTorch), and MLOps best practices.
Main Engineering Role at SpaceX (Short)
Create a 70+ question form for a SpaceX engineering position, focusing on propulsion, aerospace structures, materials science, software dev, and scenario-based problem-solving.
Long Prompt Examples
Use these longer prompts in Advanced Mode or with your Companion GPT. After finalizing, manually copy the entire JSON output into the plugin’s Form Description.
Senior-Level Web Developer (70+ Questions) – Long Prompt
Create a comprehensive, 70+ question job application form for a senior-level web developer role encompassing front-end, back-end, and full-stack responsibilities across a variety of frameworks, languages, and development environments, ensuring that each question thoroughly evaluates the applicant’s technical proficiency, practical experience, and soft skills by covering front-end frameworks like React, Angular, Vue, Ember, and Svelte along with tools such as HTML5, CSS3, JavaScript, and TypeScript, as well as back-end programming languages (e.g., Node.js, Python, Ruby, Java, C#, Go), databases (SQL and NoSQL variants), and server-side frameworks or environments; explore deeply technical topics like server architecture, performance optimization, security, and integration, while also addressing DevOps (CI/CD, Docker, Kubernetes, cloud services), version control systems like Git and SVN, and testing methodologies that integrate both unit and integration testing; ensure the final set of questions explores how the candidate blends front-end and back-end, includes scenario-based prompts to gauge professional ethics concerning security, privacy, and code ownership, incorporates pattern-recognition and logic-based tasks aimed at evaluating abstract thinking and problem-solving (without explicitly labeling these as intelligence or IQ tests), and includes personality and behavior-focused questions to reveal communication style, conflict resolution approach, team dynamics, and work ethic (again, without labeling them as DISC or any other personality framework); whenever multiple-choice options are provided, present them as exhaustive lists capturing both mainstream and niche technologies (such as less widely used languages or obscure frameworks) so that the applicant can precisely indicate their familiarity, and ensure the total question count exceeds seventy by organizing all these areas—front-end, back-end, full-stack, personality insights, cognitive reasoning, and ethical judgment—into a single, logically structured application form suitable for a senior development position.
Junior-Level Attorney (70+ Questions) – Long Prompt
Create a comprehensive, 70+ question job application form for a junior-level attorney position at a prestigious, tech-focused law firm, ensuring each question explores the applicant’s foundational legal competencies, familiarity with technology law (including intellectual property, data privacy, cybersecurity, and emerging tech regulations), and aptitude for complex contract negotiation and drafting, while also gauging their capacity to handle high-stakes corporate matters such as mergers and acquisitions or venture capital financing for tech startups; incorporate questions that reveal nuanced understanding of regulatory compliance (e.g., GDPR, CCPA, HIPAA for health tech) and litigation strategy, along with scenario-based prompts to assess ethical judgment in areas like client confidentiality, privilege, conflict of interest, and professional responsibility; further evaluate key soft skills and work style with inquiries into communication effectiveness, negotiation tactics, collaboration with cross-functional tech teams, and time management under pressing deadlines, weaving in abstract problem-solving questions that test reasoning and analytical rigor in situations unique to technology-driven legal environments (without explicitly labeling them as IQ or intelligence questions); finally, ensure any multiple-choice segments provide exhaustive options, capturing both traditional legal specializations and more niche areas of tech-focused practice, and expand the total question count beyond seventy by covering all relevant facets of junior attorney performance—ranging from day-to-day legal tasks and administrative duties to broader considerations of firm culture, client relations, professional ethics, and adaptability in a rapidly evolving digital landscape.
Senior AI Engineer (70+ Questions) – Long Prompt
Create a comprehensive, 70+ question job application form for a senior-level AI Engineer role, ensuring each question probes the candidate’s depth of knowledge in machine learning, deep learning, and related mathematical foundations such as linear algebra, calculus, and probability, while also exploring practical experience with popular frameworks (e.g., TensorFlow, PyTorch, scikit-learn) and programming languages (e.g., Python, R, C++, Java, Julia); include detailed questions about model architecture design (CNNs, RNNs, LSTMs, Transformers), data preprocessing and feature engineering, MLOps (continuous integration/deployment, containerization, orchestration with Docker, Kubernetes, cloud services on AWS, GCP, Azure), advanced topics like reinforcement learning, generative modeling, and edge deployment considerations; weave in problem-solving and pattern-recognition tasks aimed at testing abstract reasoning or logical deduction (but do not label these as IQ or intelligence assessments), and incorporate personality-oriented and ethical judgement questions that reveal the applicant’s communication style, approach to collaboration, and stance on issues such as model bias, privacy, and security; throughout the form, present exhaustive multiple-choice options for each technical or tools-based question, encompassing both mainstream and niche technologies, and ensure the total question set exceeds seventy by grouping inquiries into core competencies—mathematical and theoretical grounding, implementation skills, DevOps and automation, domain-specific expertise, and ethical considerations—while also gathering insights into problem-solving capabilities, adaptability, and team fit for a high-level AI Engineering position.
Main Engineering Role at SpaceX (70+ Questions) – Long Prompt
Create a comprehensive, 70+ question job application form for a main engineering role at SpaceX, ensuring each question delves into the applicant’s core expertise across propulsion systems, aerospace structures, orbital mechanics, materials science, and advanced manufacturing methods (including additive manufacturing and specialized composite fabrication), while also addressing broader engineering proficiencies such as systems integration, avionics, control systems, software development (C, C++, Python, MATLAB/Simulink), and design optimization techniques; incorporate scenario-based prompts to evaluate problem-solving capabilities under high-stakes conditions—such as rapid prototyping, launch anomalies, or large-scale integration challenges—alongside rigorous questions on relevant regulatory and safety standards (e.g., FAA, NASA, ITAR compliance) and interplanetary mission considerations; further, include personality and ethics inquiries exploring collaboration style, leadership approach, handling of confidential or proprietary data, and reaction to rapidly shifting priorities (without labeling them as DISC or any other framework), as well as pattern-recognition and abstract-thinking tasks that assess creative engineering solutions (without identifying them as IQ or intelligence tests); whenever the form provides multiple-choice questions, offer exhaustive lists that encompass both mainstream and cutting-edge technologies or methodologies (such as various propulsion technologies, advanced alloys, sensor packages, and software tools), ultimately organizing the form so that the final tally exceeds seventy questions and thoroughly examines both technical mastery and soft skills essential for succeeding in a high-intensity, innovation-driven environment like SpaceX.
Debug & Logging
Enable Debug Mode
- Go to the Debug & Logging tab in GravityPilot 2.
- Check Enable Debug Logging.
- Click Save Debug Settings.
Viewing the Logs
- Refresh the tab after a generation to see logs.
- The log captures SSE streaming chunks, any errors, and usage details.
Clearing / Downloading Logs
- Clear Log: Resets the log.
- Download Log: Exports .log file to share with GravityPilot Support.
Usage & Cost Considerations
- gpt-4o / gpt-4o-mini
- Max 16,384 tokens.
- Cheaper for basic forms.
- Fine for short or mid-range complexity.
- o3-mini (Reasoning/CoT)
- Max 200,000 tokens with an added Reasoning Effort setting.
- Great for complex or specialized forms (70+ questions, multiple domains).
- Must set max tokens ≥ 25,000 to avoid partial output (50,000 or more recommended).
- Partial Outputs
- If you see truncated JSON, you hit the max tokens limit. Increase it and re-generate.
- Prompt Engineering
- Detailed prompts = more relevant fields.
- See OpenAI’s prompt engineering guide for tips.
Note: The “Companion GPT” approach often saves costs overall, since you refine the form outside the plugin first.
Additional Tips & Tricks
- Default to gpt-4o-mini
- Perfect for small/medium forms if you don’t need advanced reasoning.
- Try the Companion GPT
- For large, intricate, or specialized forms, multi-turn chat leads to excellent JSON.
- Manually copy/paste the final output into Advanced Mode.
- Manual Editing
- Post-generation, open the form in Gravity Forms to add multi-page breaks, conditional logic, or calculations.
- Debug Logs
- If issues arise, enable logs. They’ll reveal token usage, SSE chunks, or error messages.
- Watch Your Token Settings
- For o3-mini, 25,000–50,000 tokens is recommended.
- For gpt-4o/mini, do not exceed 16,384.
Frequently Asked Questions (FAQ)
Does the free version include the streaming preview?
Yes, the free version’s Easy Mode also streams JSON. But it lacks Advanced Mode and CoT (o3-mini) support.
Why is my JSON partial or cut off?
You likely hit your max tokens limit. Increase it. For gpt-4o/mini, max is 16,384. For o3-mini, go 25,000+.
Can I create multi-page forms with conditional logic automatically?
Not yet. The plugin outputs a single-page form. Use Gravity Forms’ editor to add pages or conditional logic afterward.
How do I update Gravity Pilot 2?
No auto-updater yet. Check https://gravitypilot.io/my-account/downloads/ for new versions or watch for our email announcements.
Is o3-mini too expensive?
It can be pricier than gpt-4o-mini for frequent usage. However, it’s very powerful for large or specialized forms. Monitor usage at OpenAI’s billing page.
Screenshots & Visuals
Plugin Menu Location (Wp-Admin Dashboard Menu)
Easy Mode Tab
Advanced Mode
Streaming
Post-Streaming Modal - Preview, Edit, Close
Debug & Logging Tab

Companion GPT
Support & Useful Links
- Buy Gravity Pilot 2
https://gravitypilot.io/buy/ - Template Library / Shop
https://gravitypilot.io/shop/ - Paid User Support
https://gravitypilot.io/support/ - Contact (Sales, Feedback, Beta Requests)
https://gravitypilot.io/contact/ - My Account (Downloads)
https://gravitypilot.io/my-account/ - OpenAI API & Account
https://platform.openai.com/ - OpenAI Pricing
https://platform.openai.com/docs/pricing - OpenAI Model Info
https://platform.openai.com/docs/models - OpenAI Prompt Engineering
https://platform.openai.com/docs/guides/prompt-engineering
Conclusion
Gravity Pilot 2 merges Gravity Forms with OpenAI to let you create robust, specialized forms swiftly. Whether you prefer Easy Mode’s simplicity or the Advanced Mode with Reasoning/CoT and Companion GPT, this plugin offers flexibility for all user levels.
- Free: Great for quick, small forms with streaming previews.
- Paid: Essential for advanced use-cases—70+ question forms, specialized fields, token usage insights, and multi-turn GPT conversations.
If you need help, check your Debug & Logging tab, adjust max tokens if you see incomplete outputs, and reach out via https://gravitypilot.io/support/ with your logs if needed.
Thank you for choosing Gravity Pilot 2! We look forward to seeing the powerful forms you create.
Premium Pass
$49
/ year
- Access to ALL GPT Models
- Uncapped Token Length
- Companion GravityPilot GPT “Full Version”
- Access to All Templates at gravitypilot.io
- Unlimited Sites
Premium Support
- Fastest Response
- Pre-Release Beta Access
- Access Paid Templates Free
Limited Time Offer
